Adding Surveys to Courses/Paths/Events
Roles: Admins
Description: This article guides admins on how to add surveys to courses, paths, and events to collect feedback and enhance participant engagement.
Benefits:
Collecting Valuable Feedback: Surveys enable admins to gather direct input from participants helping to identify strengths and areas for improvement.
Improving Learning Experiences: Admins can use survey data to enhance course content and teaching methods, ensuring a more effective and engaging learning experience.
Measuring Participant Satisfaction: Surveys provide insights into how satisfied participants are helping admins to refine future offerings and increase overall satisfaction.
Gaining Insights for Future Improvements: The feedback collected can highlight trends and common challenges, helping admins to make continuous improvements for better outcomes in future sessions.
Step-by-Step Guide: You may refer to the screenshots below for a step-by-step guide on how to add surveys to Courses, Paths, and Events.
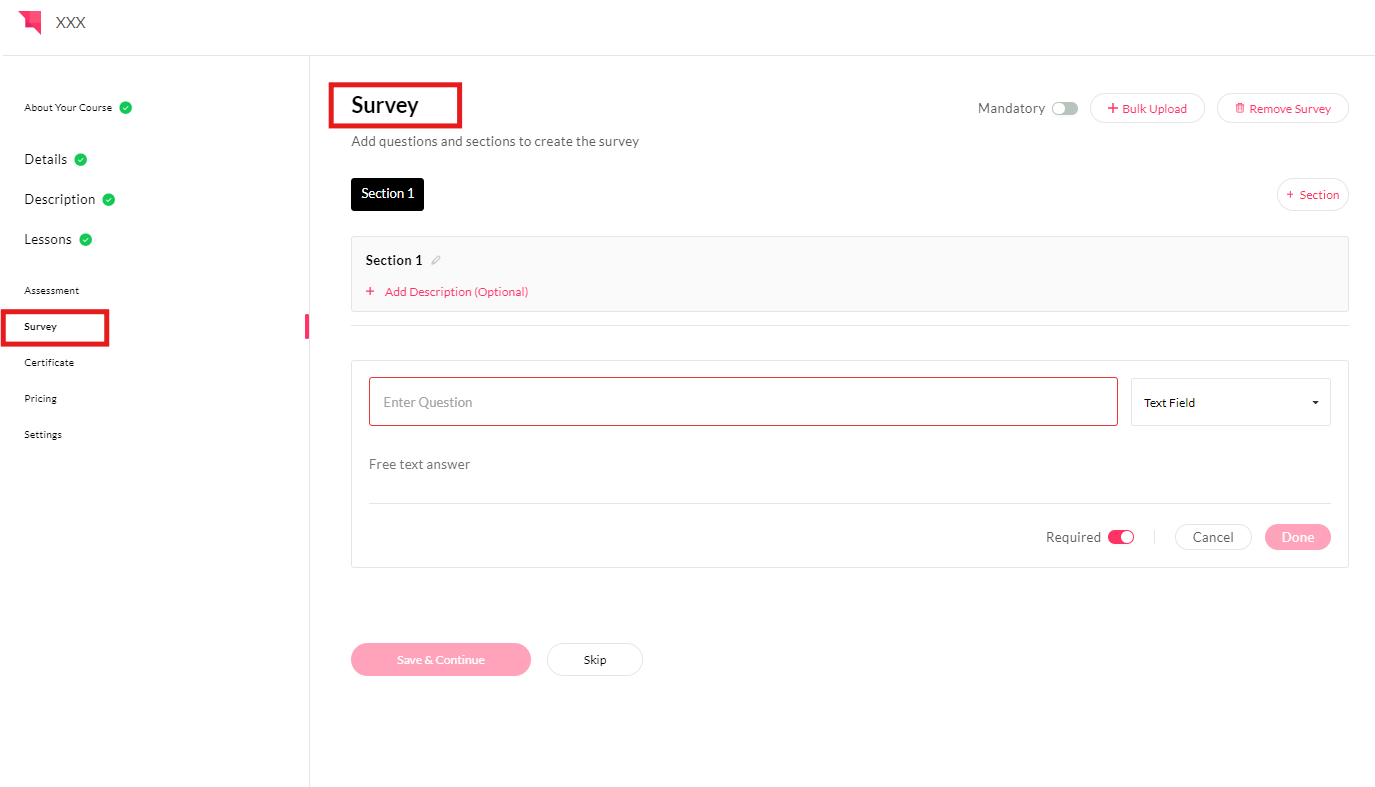
Step 1: Once a course, path, or event has been created, navigate to the "Surveys" section to add a survey.
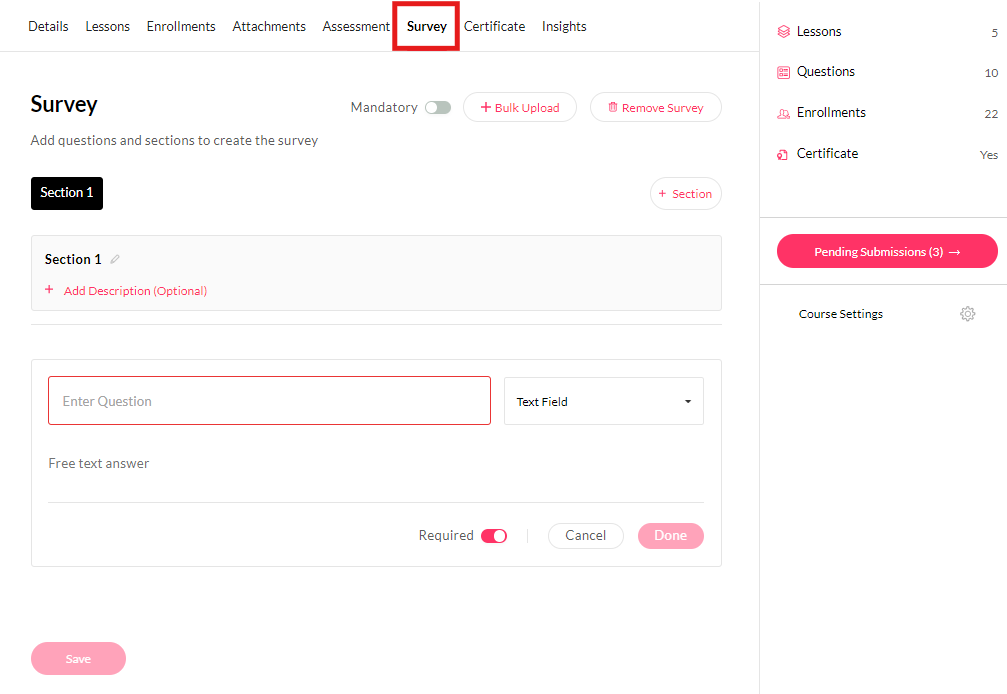
Step 2: Once you reach the "Surveys" step in the respective flow, you can either:
Add questions to the survey one at a time on the platform, or
Import the survey questions from a file.
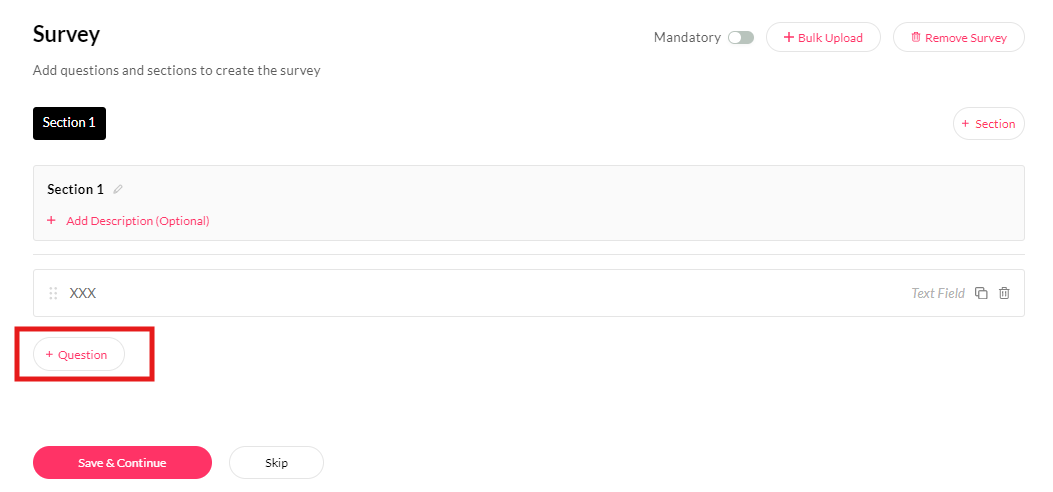
Step 3: To begin creating the surveys, you can add a "Section title" and "Description".
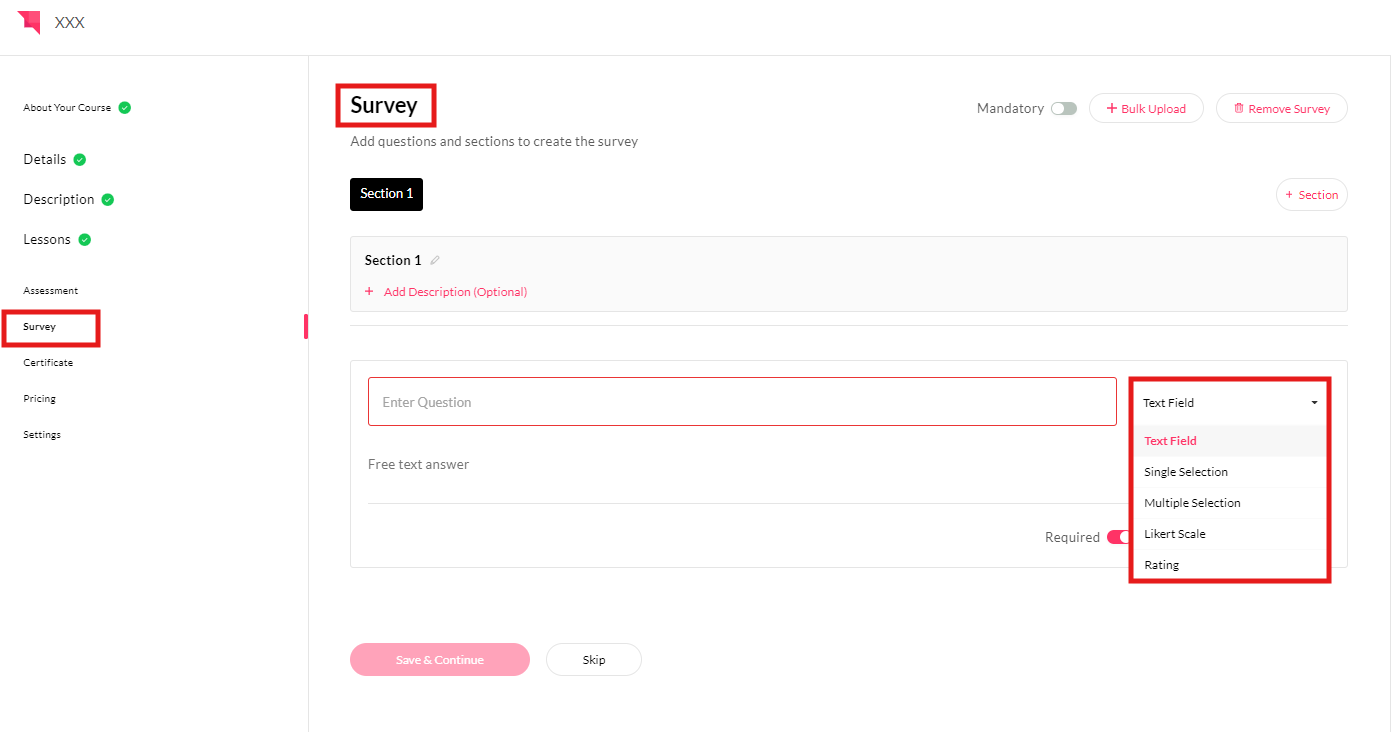
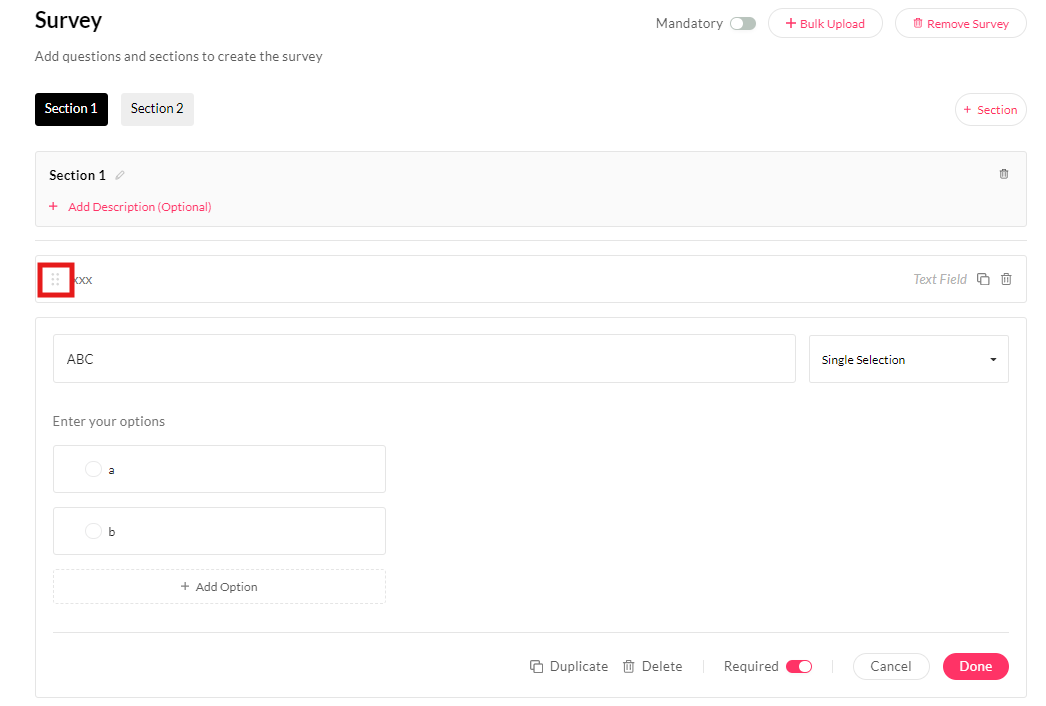
Step 4: Type in your question and choose the appropriate response type, such as:
Single Select: Learners can choose only one answer from a list of options. This is useful for questions where you want to gather a specific, singular opinion or selection.
Multi Select: Learners can choose multiple answers from a list of options. This is ideal for questions where more than one response is applicable, such as selecting multiple preferences.
Likert Scale: This scale allows learners to rate a statement on a predefined scale, usually ranging from "Strongly Disagree" to "Strongly Agree." It’s commonly used to measure attitudes, opinions, or satisfaction levels.
Ratings: Learners rate something (e.g., a course, training, or event) on a scale, such as 1 to 5 stars. This is often used for gauging satisfaction or overall quality.
Free Text: Learners provide an open-ended response, typing in their answers. This is best for gathering detailed feedback or opinions that don’t fit into predefined choices.
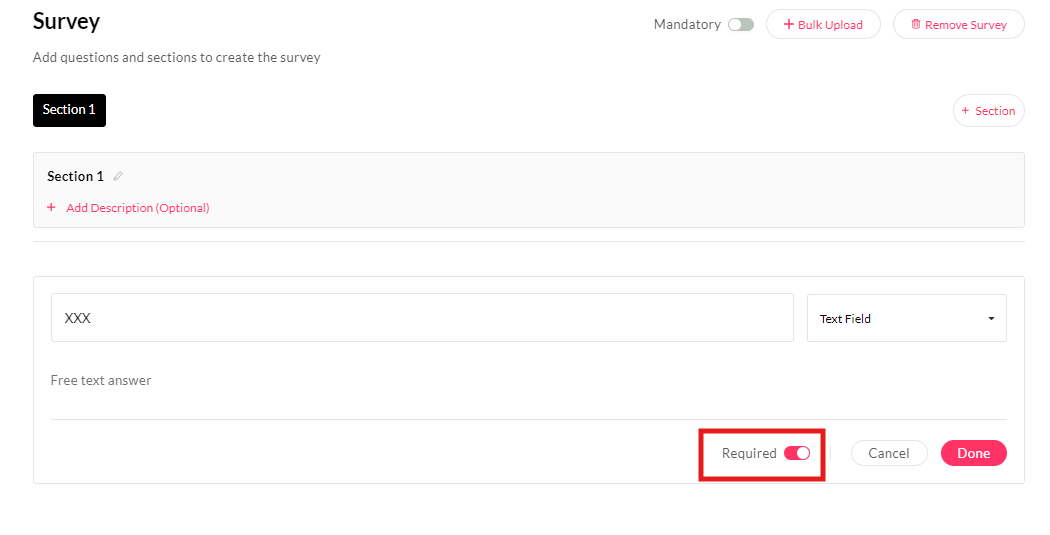
Step 5: Admins can mark each question as mandatory by toggling the 'Required' option.
Step 6: Once the question is added, click 'Done'.
Note: You can continue adding more questions. A maximum of 25 questions can be added in a single section.
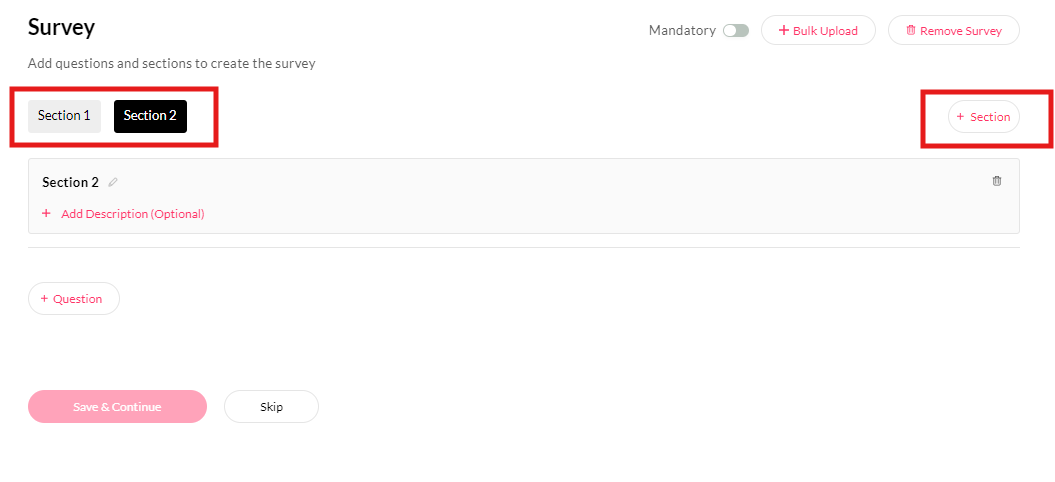
Step 7: Multiple sections can be added to the survey by clicking on the '+ Add Section' button at the top right of the survey form. Up to 10 sections can be added.
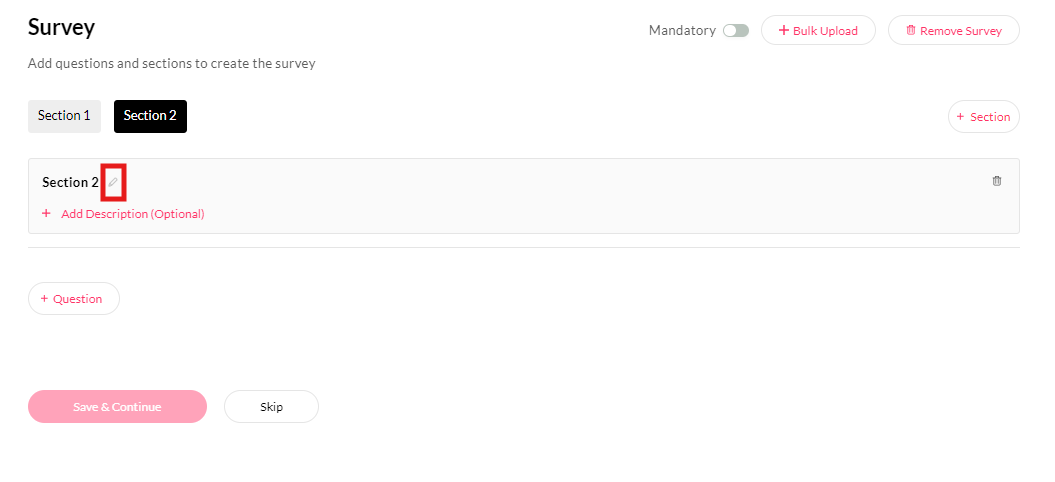
Step 8: Each section will appear horizontally as a tab. To view a section, click on its title. The section title can be edited by clicking on the pencil icon next to it.
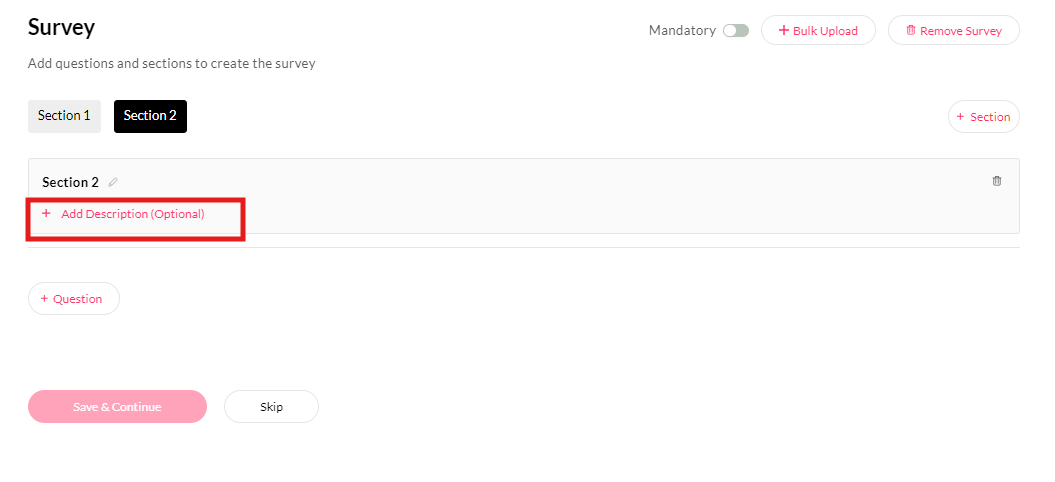
Step 9: A description can be added to each section by clicking on '+ Add Description' below the section title.
Step 10: ''Questions'' can be rearranged by dragging and dropping them using the handle to the left of the section title.
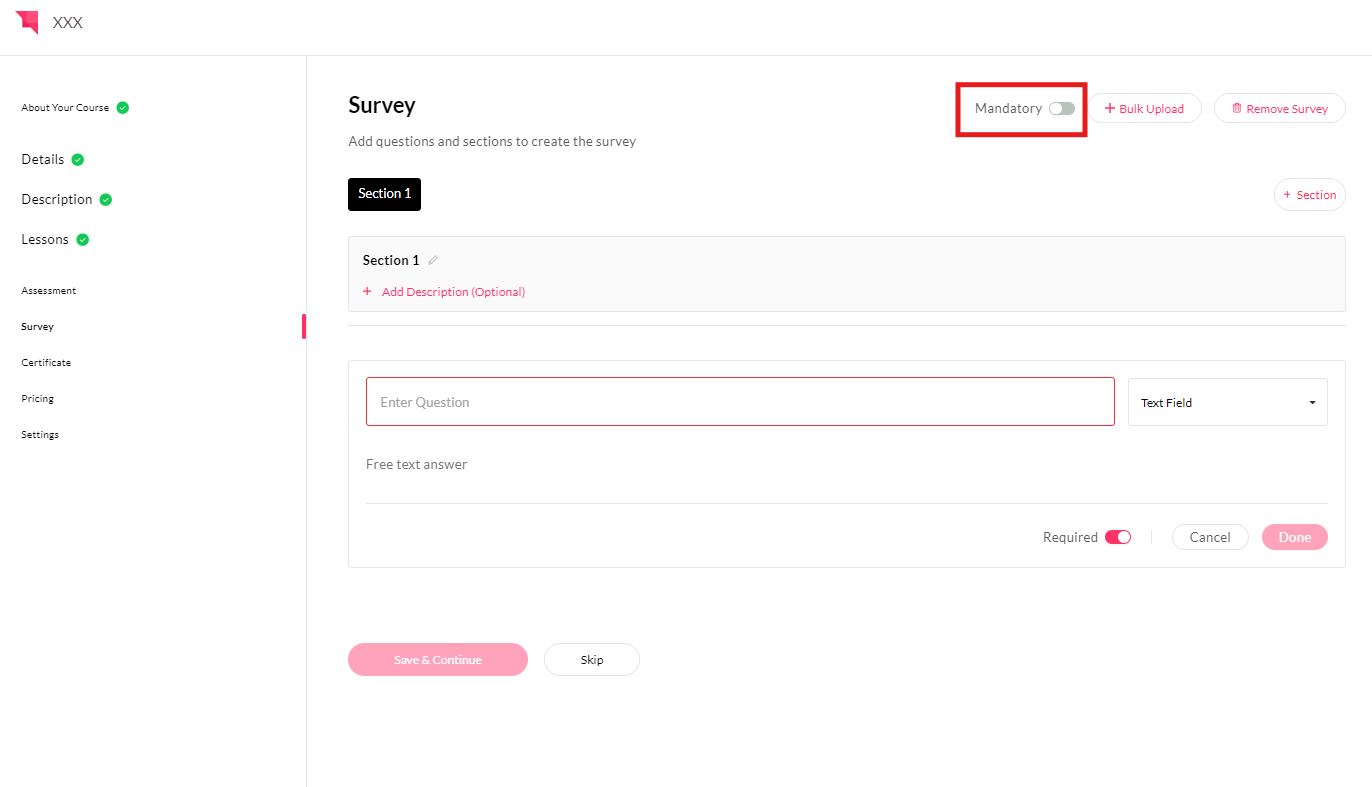
Step 11: To make the survey mandatory, toggle the 'Mandatory' option at the top of the survey creation page.
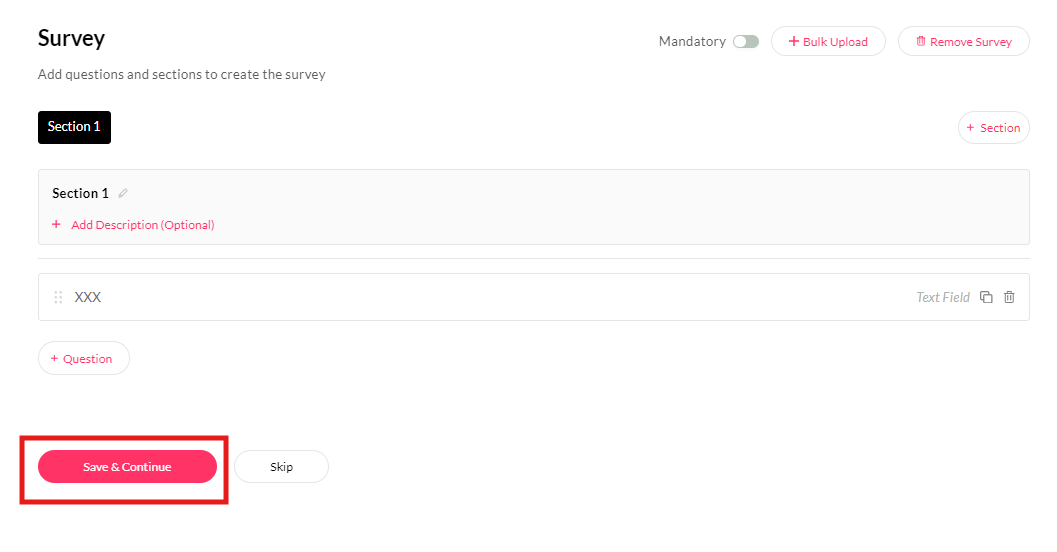
Step 12: Once finished, click 'Save & Continue' to confirm and add the survey to the training. The survey will then be available to all learners who have not yet completed the training.
Importing Survey Questions from a Template File
To import survey questions to a training from a file, follow these steps:
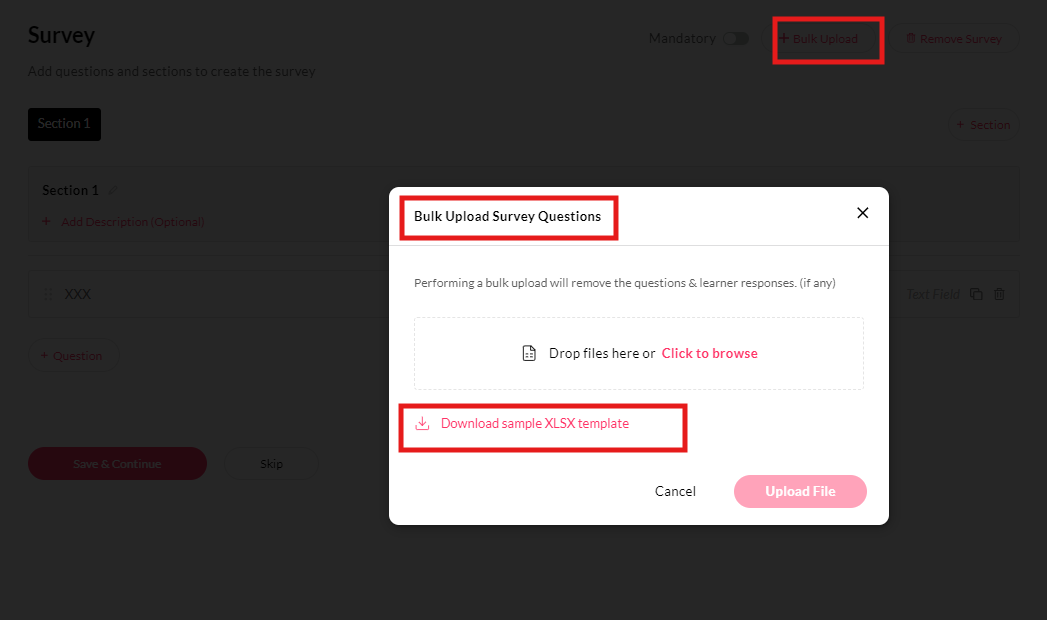
Click on '+ Bulk Upload'. A popup will prompt you to upload a file in the required format. To ensure the correct format, download the 'Sample XLSX Template'. Open the downloaded file in an application that supports editing .xlsx files. This template includes the necessary data validations and formatting to help you add questions, define response types, and set options.
Description: This article guides admins on how to add surveys to courses, paths, and events to collect feedback and enhance participant engagement.
Benefits:
Collecting Valuable Feedback: Surveys enable admins to gather direct input from participants helping to identify strengths and areas for improvement.
Improving Learning Experiences: Admins can use survey data to enhance course content and teaching methods, ensuring a more effective and engaging learning experience.
Measuring Participant Satisfaction: Surveys provide insights into how satisfied participants are helping admins to refine future offerings and increase overall satisfaction.
Gaining Insights for Future Improvements: The feedback collected can highlight trends and common challenges, helping admins to make continuous improvements for better outcomes in future sessions.
Step-by-Step Guide: You may refer to the screenshots below for a step-by-step guide on how to add surveys to Courses, Paths, and Events.
Step 1: Once a course, path, or event has been created, navigate to the "Surveys" section to add a survey.
Step 2: Once you reach the "Surveys" step in the respective flow, you can either:
Add questions to the survey one at a time on the platform, or
Import the survey questions from a file.

Single Select: Learners can choose only one answer from a list of options. This is useful for questions where you want to gather a specific, singular opinion or selection.
Multi Select: Learners can choose multiple answers from a list of options. This is ideal for questions where more than one response is applicable, such as selecting multiple preferences.
Likert Scale: This scale allows learners to rate a statement on a predefined scale, usually ranging from "Strongly Disagree" to "Strongly Agree." It’s commonly used to measure attitudes, opinions, or satisfaction levels.
Ratings: Learners rate something (e.g., a course, training, or event) on a scale, such as 1 to 5 stars. This is often used for gauging satisfaction or overall quality.
Free Text: Learners provide an open-ended response, typing in their answers. This is best for gathering detailed feedback or opinions that don’t fit into predefined choices.
Step 5: Admins can mark each question as mandatory by toggling the 'Required' option.
Step 6: Once the question is added, click 'Done'.
Step 11: To make the survey mandatory, toggle the 'Mandatory' option at the top of the survey creation page.
Step 12: Once finished, click 'Save & Continue' to confirm and add the survey to the training. The survey will then be available to all learners who have not yet completed the training.
Importing Survey Questions from a Template File
Caution: Importing a file will remove any previously added questions and replace them with the ones from the uploaded file.
Important Notes for Filling the Template File:
Do not delete, add, or rearrange any rows or columns in the file.
Only fill in cells with valid data as specified by the data validation rules.
Enter questions in the appropriate sections and provide their options.
A section will not be created if no questions are added to it.
A question will not be created if any required fields are left empty.
Section titles and descriptions must be manually added on the platform.
Once the file is complete, save and upload it through the same popup. All sections and questions, along with their configurations, will be added to the survey.
After the import is complete:
You can customize section titles and descriptions directly on the platform.
The survey can be made mandatory by toggling the 'Mandatory' option at the top of the survey creation page.
Click 'Save & Continue' to update the training with the imported survey.
Replicating a Survey from One Training to Another Using Bulk Upload
The Bulk Upload method for adding surveys is particularly useful if a survey is already added to one training and you want to duplicate it to another training. Here’s how you can import the survey questions from another training:
Open the Existing Training with the Survey: Navigate to the training that already has the survey you want to replicate.
Click on the 'Surveys' Tab: On the training details page, click on the 'Surveys' tab to view the survey associated with the training.
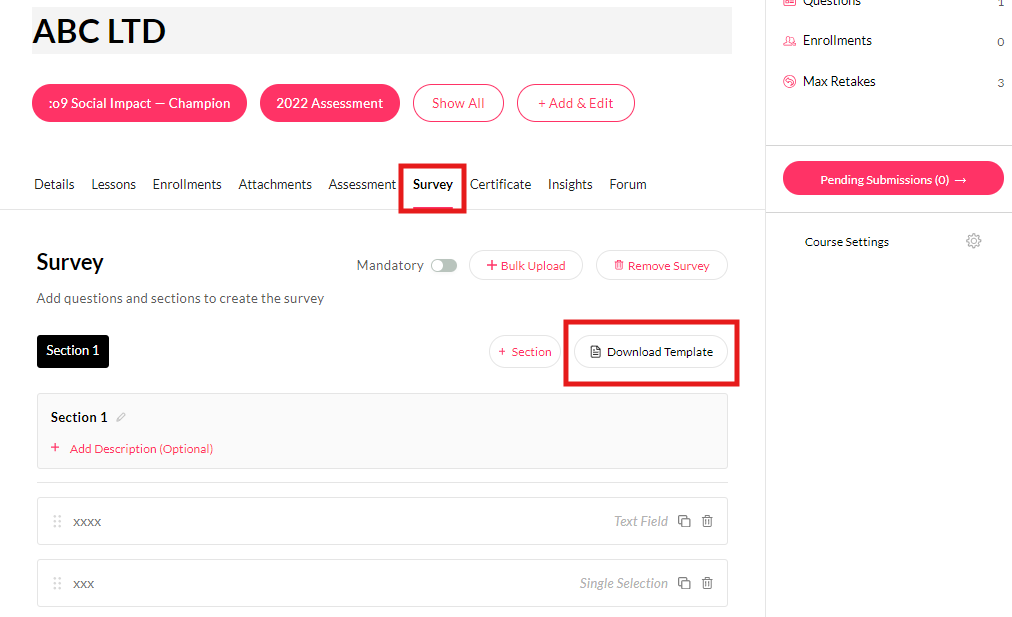
Download the Survey Template: In the Surveys section, click on the 'Download Template' button located at the top right. This will download a file that contains the survey’s contents, formatted for bulk upload.
Open the Target Training and Edit It: Open the training where you want to add the survey. Click Edit and navigate to the 'Surveys' step of the creation flow.
Upload the Survey File: Click on the 'Bulk Upload' button at the top of the page and select the file that was downloaded earlier. This will import the survey questions into the new training.
Review and Customize the Survey: Once the import is completed, the survey will be replicated as intended.
You will need to manually add the titles and descriptions for each section.
If the survey is intended to be mandatory, you will need to manually configure this setting.
Save and Update the Training: Click on 'Save & Continue' to update the training with the survey.
Survey Availability and Admin Access: Once the survey is added to the training, all learners who have not completed the training will be prompted to complete the survey. Admins will also be able to view the submissions made by learners.
Impact of Editing a Survey
When a survey is edited and saved, the latest version will be reflected for all users who have submitted responses. Here's how the changes will affect existing submissions:
Added Questions: Any questions added after a user has submitted their response will appear when viewing their submission, but the user's response to those questions will remain blank.
Added Questions: Any questions added after a user has submitted their response will appear when viewing their submission, but the user's response to those questions will remain blank.
Removed Questions: Questions that are removed after a user submits their responses will be deleted from the user's response sheet.
Changed Options: If options are added or removed, removed options will be omitted from all response sheets, while added options will appear but remain blank in the user submissions.
Do not delete, add, or rearrange any rows or columns in the file.
Only fill in cells with valid data as specified by the data validation rules.
Enter questions in the appropriate sections and provide their options.
A section will not be created if no questions are added to it.
A question will not be created if any required fields are left empty.
Section titles and descriptions must be manually added on the platform.

You can customize section titles and descriptions directly on the platform.
The survey can be made mandatory by toggling the 'Mandatory' option at the top of the survey creation page.
Click 'Save & Continue' to update the training with the imported survey.
Open the Existing Training with the Survey: Navigate to the training that already has the survey you want to replicate.
Click on the 'Surveys' Tab: On the training details page, click on the 'Surveys' tab to view the survey associated with the training.
Download the Survey Template: In the Surveys section, click on the 'Download Template' button located at the top right. This will download a file that contains the survey’s contents, formatted for bulk upload.
Open the Target Training and Edit It: Open the training where you want to add the survey. Click Edit and navigate to the 'Surveys' step of the creation flow.
Upload the Survey File: Click on the 'Bulk Upload' button at the top of the page and select the file that was downloaded earlier. This will import the survey questions into the new training.
Review and Customize the Survey: Once the import is completed, the survey will be replicated as intended.
You will need to manually add the titles and descriptions for each section.
If the survey is intended to be mandatory, you will need to manually configure this setting.
Save and Update the Training: Click on 'Save & Continue' to update the training with the survey.
Survey Availability and Admin Access: Once the survey is added to the training, all learners who have not completed the training will be prompted to complete the survey. Admins will also be able to view the submissions made by learners.

Impact of Editing a Survey
Added Questions: Any questions added after a user has submitted their response will appear when viewing their submission, but the user's response to those questions will remain blank.
Removed Questions: Questions that are removed after a user submits their responses will be deleted from the user's response sheet.
Changed Options: If options are added or removed, removed options will be omitted from all response sheets, while added options will appear but remain blank in the user submissions.
Read more:
- Enabling Surveys for your Organization
- Viewing Survey Responses
- Viewing Survey Responses
Related Articles
Events Addition In Learning Paths
Role: Admins Description: In this article, we’ll explore how to add multiple events to your learning paths. You can enhance your curriculum by creating a blended learning experience to include both events and courses within a path. We'll guide you ...How to configure Scheduled Reports for Users, Teams, Courses, Events and Paths
How to configure Scheduled Reports for Users, Teams, Courses, Events and Paths With the new Reports section Learn LMS will be able to generate reports for you without any Admin having to manually export them from Insights page of ( User / Teams / ...Editing Learning Paths
Description: This article explains a solution that allows administrators to easily edit learning paths in Auzmor Learn. With the flexibility to edit existing learning paths, admins can update program structures as needed without starting from ...Enabling Surveys for your Organiziation
Enabling Surveys for your Organiziation Primary admins of each organization can enable surveys for their respective organizations. Once enabled, other admins will be able to include surveys in learning paths and use the tool to gather specific and ...Events for Managers
Events for Managers Similar to courses & paths, managers' capabilities have been expanded to discover & assign events that they see suitable for the teams they manage. When you log into Learn as a manager, you will now be able to find "Events" as a ...